LaunchWP.io allows you to run blazing-fast WordPress website on any server or VPS or cloud provider such as Linode, Hetzner, GCP, Vultr, AWS, Azure, DigitalOcean, AliBaba Cloud or even custom VPS. And FlyingPress is a WordPress performance optimization plugin (mainly for page-caching) designed to enhance website speed and improve Core Web Vitals with minimal configuration. Lastly about FlyingCDN, it’s a product of FlyingPress as well, a proxy based CDN powered by Cloudflare Enterprise to empower your website with features like Edge Page Caching with 310 edge locations, Argo Smart Routing, On-Fly WEBP conversion, DDoS protection with firewall and many more.
But why should you even use the combo of LaunchWP + FlyingPress + FlyingCDN? Well it’s a full stack for your WordPress website’s Blazing-Fast speed. LaunchWP powers your VPS with Enterprise-Grade Object Caching, Proxy caching, and NGINX caching powered by SRCache, FlyingPress powers your WordPress with performant resource optimizations, page caching, Javascript and CSS optimization, and many more. Lastly FlyingCDN helps you deliver your website from over 310 edge locations with automatic WEBP conversion for your images, DDoS protection, Image Compression, all powered by Cloudflare Enterprise.
Let’s see how to configure FlyingPress and FlyingCDN to work with LaunchWP.io for optimal performance. 🙂
Table of Contents
Enable LaunchWP NGINX Proxy Cache
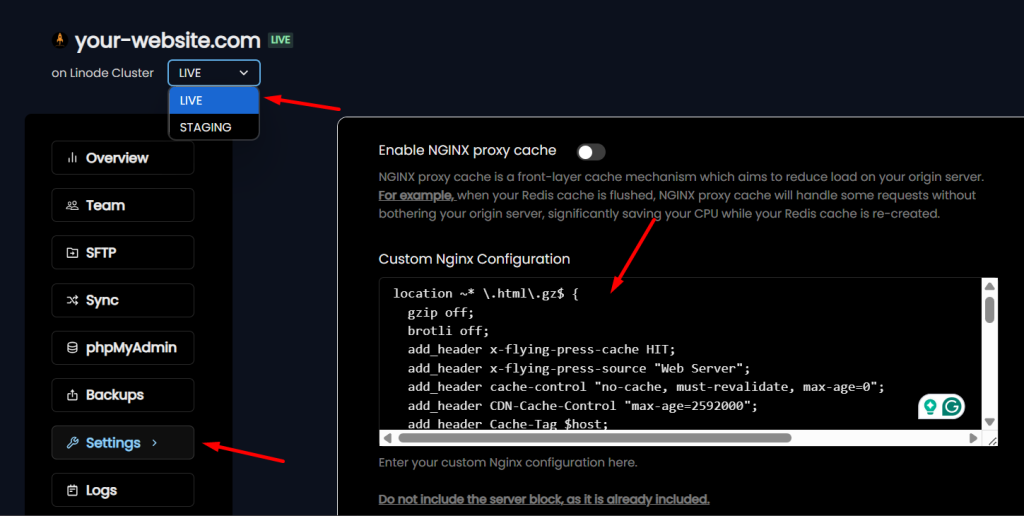
Aside from the auto-configured Object Caching, LaunchWP offers something called Proxy cache. LaunchWP’s NGINX proxy cache is a front-layer cache mechanism which aims to reduce load on your origin server. For example, when your Redis cache is flushed, NGINX proxy cache will handle some requests without bothering your origin server, significantly saving your CPU while your Redis cache is re-created. Navigate to the LaunchWP Server Dashboard, go under your Site > Settings > Enable NGINX proxy cache. Save the Settings afterwards.

Adding NGINX config for FlyingPress in LaunchWP Dashboard
LaunchWP uses NGINX to run your WordPress websites. FlyingPress by-default uses PHP to serve cached pages when running on NGINX. If you prefer the LaunchWP NGINX web server to serve the cached pages directly, you would need to add FlyingPress’s NGINX configuration in your NGINX config. Luckily, unlike other hosting providers, in LaunchWP, adding custom NGINX config is super easy, simply copy-paste the config from in your LaunchWP.io Server Dashboard.
- Copy the NGINX config from FlyingPress Documentation: https://docs.flyingpress.com/en/article/nginx-configuration-to-serve-cache-directly-1m2sgsz/
- Login to your LaunchWP.io Server Dashboard and navigate under your Site > Settings > Custom Nginx Configuration, and paste the NGINX config you just copied.
- Scroll down to Save Changes.

(FlyingCDN) Get Server IP from LaunchWP for FlyingCDN
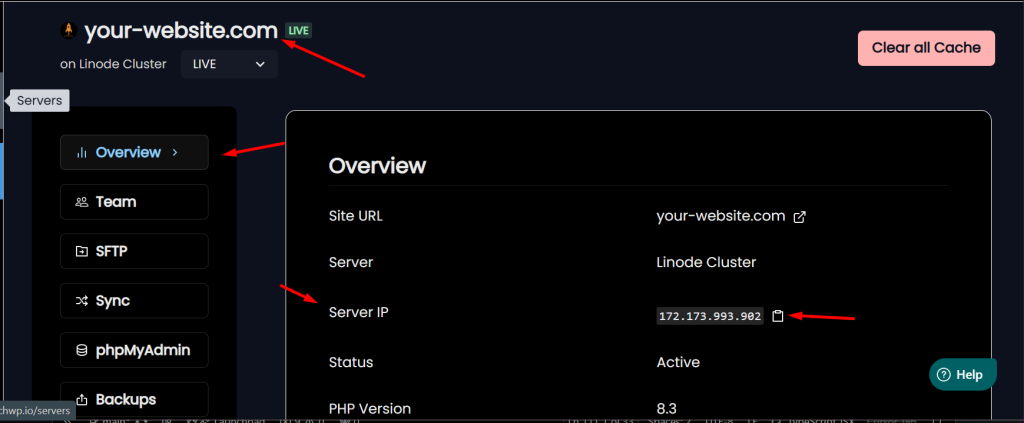
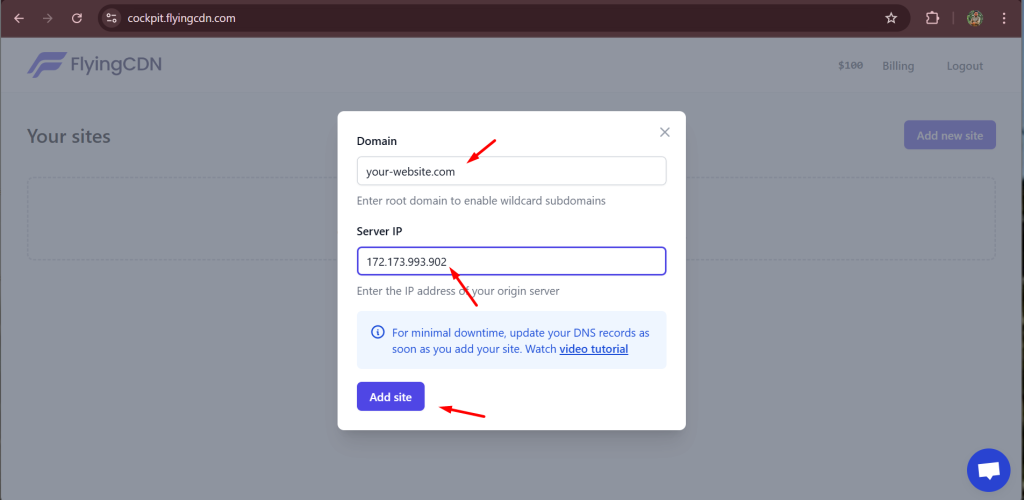
You can find the step by step instruction on how to setup FlyingCDN on their documentation: https://docs.flyingpress.com/en/article/how-to-setup-flyingcdn-in-flyingpress-1rjhwn5/. Naviagte to https://cockpit.flyingcdn.com to get started, and the part where you would need LaunchWP is to get your Server IP Address. To get the Server IP Address for connecting to FlyingCDN, go to your LaunchWP Server Dashboard > Your Site > Overview > Server IP. Simply click to Copy and paste that in your FlyingCDN dashboard.


Follow the remaining steps found in FlyingCDN setup guide, and that should give your website the power of Cloudflare Enterprise. 🙂
And there you have it! Your Blazing-Fast WordPress website now runs on your own server, powered by LaunchWP, FlyingPress and FlyingCDN. We have covered multiple techniques to make sure your FlyingPress-powered websites runs blazing-fast, is efficient, resource optimized and doesn’t cause any conflicts. This is a Human 👨 written article, and to err is Human, so feel free to let us know if you have any feedback or suggestions. We would be more than happy to assist further. Checkout our super-low pricing, and Get Started Today with LaunchWP.

