This guide aims to help you set up a Vultr Object Storage bucket for storing site backups. Start by signing in to your Vultr account.
Configure and Setup
- Once signed in, go to Cloud Storage > Object Storage. Once the page loads, click + Add Object Storage.
- In this first step, you’re creating an object storage group. You can have many buckets inside an object storage group.
- Choose a datacenter region that’s geographically close to your server location. This will improve the time it takes to copy backup files from your server to the Vultr bucket.
- Enter a unique label for the group. If you’re planning to have multiple buckets for backups in this region for multiple servers and sites, you might label it “Site Backups” for example. Otherwise, you might want to name it the same name as your bucket. A good bucket naming scheme is “domain-backups” e.g. “web-for-ahona-backups”. Click Add.
- Once Vultr creates the object storage group and it’s ready, click on it. Now click the Buckets tab and then the Create Bucket button.
- Enter the bucket name (e.g. web-for-ahona-backups) and click the Create Bucket button. It’s fine to ignore the other options.
Create Access Keys
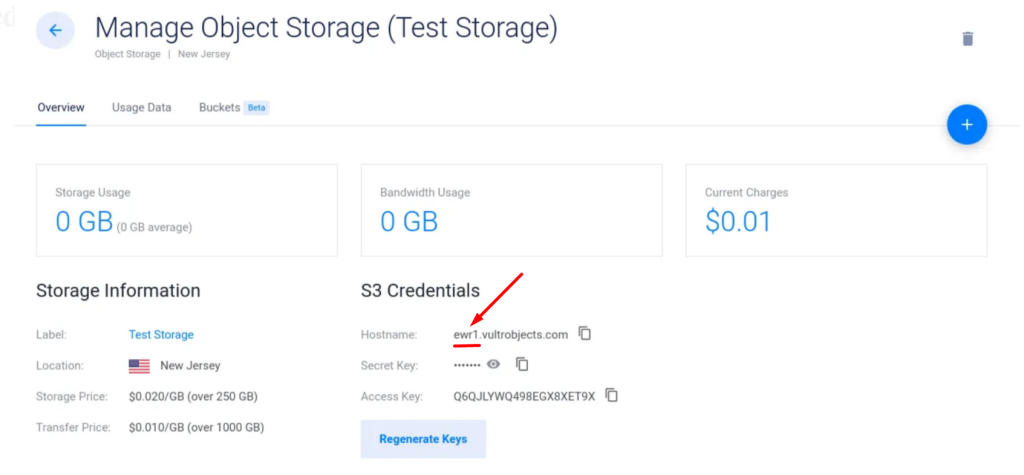
- On the next screen you’ll notice the S3 Credentails section.
- You will need to copy the Secret Key and Access Key when creating the Vultr backup provider in SpinupWP and that should be all you need.
Connect with LaunchWP
Comeback to LaunchWP, and go to your Site > Backups > Providers. Click on Add New Provider. Here is a map of what you need to enter to connect.
- Provider Type – Vultr
- Provider Name – It should be just a identifer for yourself. You can enter any name as you want.
- Access Key ID – Paste the Access key from the Vultr shown on the last screenshot.
- Secret Access Key – Paste the Secret Access key from the Vultr shown on the last screenshot.
- Bucket Name – Remember the name of the Bucket you created? For this doc, it was web-for-ahona-backups
- Region – The Region you selected on Step 3 of Configure and Setup. To find your region of Vultr, you can view the Hostname, and find the region slug from it. For example, if your Vultr Hostname is:
'ewr1.vultrobjects.com', then your region code will be ‘ewr1’.

Below is how my configuration looks right now.

Finally click Add Provider.
And that’s how you can connect Vultr with LaunchWP. Now you can create on-demand backups or schedule Automatic backups. If you face any issues, feel free to get in touch with us, and we would be more than happy to assist.

